Saturday, December 15, 2012

Awards exhibition, Christmas wishes and Bon Voyage

This will be my final post for this year so a Merry Christmas and a Happy New Year to everyone.

 It is also the printing groups award year this year and I entered a woodblock and lino reduction print. The image was taken from my own photograph of three ducks at Tamworth Gardens. It's not a large print and unframed is 28.5x21cm. The background(woodblock) which in the photo was the stand of trees they were resting under. When I pulled the print it looked more like water to me so decided to leave it alone and moved onto the ducks. I rearranged the centre duck to view it's head and to capture it's attitude better. The marking on the centre duck has been changed as well for artistic purposes but the two with the dark collars are genuine markings. These two were influenced by a family visiting our back lane about mid year and the colours are a deep emerald green turning nearly black in the shade against the white body. The positioning of the ducks is original apart from slightly moving the middle one and it was the perfect oppturnity to show the collar shape of the other two.

The foreground was handpainted with oilpaints, scratching and some drawing to enhance the grass.
I then cutaway the foreground and concentrated on the ducks using oil based inks and reduction method, handpulled on Fabriano watercolour 130gms paper.


"Duck Friends" 2012
 
The New Year will be exciting for me as I will be cruising to New Zealand with my sister for her 70th birthday. It is ladies only, hubbies keeping the homefires burning so to speak.
My very first cuise and visit to New Zealand  for two weeks with a few days in Brisbane with another two sisters , unable to make it on the return home. My camera will forever be ready to capture our wonderful experience and hopefully some nice prints in the future.


Friday, November 16, 2012

Secret Santa

Not only do my family do this but the art group I am with do it too so I'm not saying which one this secret Santa gift belongs to.
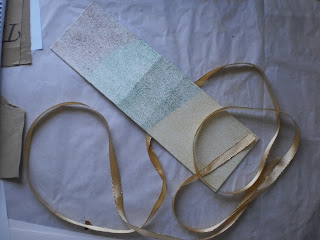
It's always handy to have a desk calendar sitting about so designed my own replaceable cover from two pieces of box board with a finer piece for the fold over spine. Rummaged around the left over materials drawer and found some nice printed experiment paper I had done a while ago and for the inside covers a couple of pieces from a friend which I have always liked so happy to pass it on in some way.
I guess the hardest part was working out how to attatch it all and still be able to reuse in future years should the receiver care to continue useing it.

As a bonus , or should I say necessary instruction on how to repalce calendar was included with a card and easy to follow instructions.

Outside covers with ribbon to tie shut.
 
The inside covers with pretty paper from my friend.
At this stage it was working out so well I was tempted to keep it and isn't that a sign of a good gift?
It has been said to me in the past if you buy some one a gift you would like to keep then it's a good one.
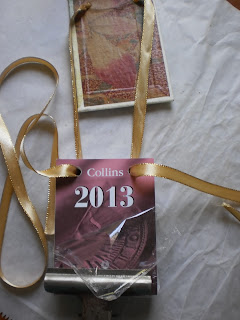
By keeping the wrapping on the lower half of the calendar with a bulldog clip it was easier to thread the ribbon through the holes . This is one of the instructions.
 
Calendar in place ready to tie off.
And ready to present with "instruction/best wishes card".
What I enjoyed most was matching left over materials and nutting out how to attatch it all.


Friday, October 5, 2012

Concepts by Two

I spent time sitting at the exhibition in the local library and rather a quiet afternoon so came home to a well deserved coffee. After all I do have other art related projects to attend to and unless you are involved with creating I don't think the general public realise how much time and effort goes into even just one piece. It's not as easy as having an idea and producing it.

So here are some photos of a few on the wall.Remember there are only 12 on the wall but more in the folio.

These are two of my prints with the one on the left some might recall from a previous post. Hand pulled print , both the print and background which was an experimental session one afternoon. I liked the colours together and the subject is one of my grandsons talking to the chooks we visit weekly.
The Bird on Lacy Wing is a remodel of a favourite lino plate with a precoloured background and the bird has been printed seperately and has cutout lace wings and glued onto the paper. I liked the bird shape and felt it had a bit more use left in the plate. Please excuse the reflections as hard to photograph with large windows behind which puts them on an unusual angle too.
 
This one is my "lino sculpture" or recyled plates. I developed this to hang on my back wall when the new balcony is finished and besides I liked all the plates and I did a post about them earlier. I am looking forward to hanging it in it's home soon.
 
 
I especially like this one of Di's print. It has a  delicate and simple arrangement to it as do her drawings some with just a touch of colour for emphasis.


Wednesday, September 26, 2012

Continuation of experimenting.

Next week is exhibition time for a short week at local library.This is the finish of previous post on something special I wanted to share. It was born from our  renovation of the back deck and the cream wall of the house and I sat there looking at this wall  and wondering what I could put there then the penny dropped . What does one do with old lino plates? especially favourite ones that I had enjoyed cutting and though I don't adhere to one particular "theme" this turned out to be botanical.

I cleaned or recut each plate and chose an old drawing board to recycle as this was partly the idea, to  make use of materials just lying around.


This was my test piece.Another old lino plate glued to a board with liquid nails after the "new" plate was inked and dry.    
 
Being rather pleased with the results I went ahead with the larger piece.
 
 
The handmade stencil.
 
Inking one of the stencils.


Finished stencil.


Layout for the larger piece pre inking,stenciling and gluing to the board.
 

I tried various layouts for each plate but always came back to this one.So now I have a recycled artwork I can enjoy for years to come which doubles as decoration. Four of the prints from these plates have been exhibited in a group situation and one other was a home exercise and the leaf design was taken from woodblock workshop, yes, Jill O'Sullivans I attended earlier this year and I extended the design to one lino with a change of direction for the leaves.

Now it's time ot move onto my next project which is a collobration with the printmaking group I am a member of.


Friday, August 10, 2012

Collaborative printmaking

Back in January 2011 my friend and I applied to be a part of "City of the World" puzzleprint. Maria Arango Las Vegas, Nevada,USA , MCPP Puzzle Prints . (puzzleprints.blogspot.com) is the lady with the wonderful talent of pulling this amazing piece of artwork together. "City of the World" was her third puzzle print and I kept my own journal as it developed.

Those who committed themselves to do this were sent a special size and shaped block of wood which we weren't allowed to change in any way apart from carving an image of our own choice. The mysterious part was naturally we didn't know where our piece fitted in the puzzle but I found as I think others did also that the actual shape of the block influenced the image.

Unbeliveably over one hundred artists, world wide submitted a block which Maria and her happy band of helpers assembled , which to me is mindboggling when I stop to consider the process. I was so pleased and could really appreciate their efforts as I created the journal through the stages.Maria , who has a wonderful sense of humour and so easy to relate with via the web also possess a never ending energy level.

From the planning stage of the whole image, buying of materials, organising helpers etc and keeping everyone up to date on the progress just shows a little bit of her enthusiasm and her love of printmaking.

I know I am so very proud to have been a part of this wonderful project and very willing to participate again. Only two prints are in my hometown.


My small block of wood, I was very keen to start and did a trial run on the reverse to test my tools and the texture of the wood. I was slightly struck in regards to the shape of the block resembling my state of Queensland.

My drawing on paper and I also did one with shaded areas to guide me through the carving stage.


This is the block ready to be returned . Maria asked everyone to include a sheet of our local newpaper. I thought that this was a brilliant way to learn more about each person.

And here is the print, all five full size papers which made it about 2.something meters long. I have yet to frame it but I do have a hanging position for it.
The framing situation will take a while as to protect it under glass won't be a cheap exercise and I do want to preserve it as much as possible.

I know this print will provide me with pleasure for years to come as each time I view it there is always a new "something" to find. There will be many hours spent admiring other's techniques and mark making.


Life is busy experimenting.

Good afternoon readers and I apologise for not writing before this but I have been busy with family, life in general and as the heading says experimenting.

This is something one needs to do when the mood strikes  just like our other art adventures. In the end it's the results that count and the learning process as we go.

I arrived at that point I am sure you all have been at where the ideas just keep colliding with each other in your creative side versus what one must do on a daily basis. Rather frustrating until I realised that all I need to do was take a deep breath and break my thoughts down into smaller , manageable areas and move forward from there.

However hopefully I will be displaying the finished product of my endeavours at a local exhibition and at least one will be presented as  an awards entry. I am happy with a lino I am currently working on using adapted techniques in the application of the ink.
So has that tidbit piqued your interest? Pictures and explanation later after the event, I promise as don't want to preempt my own ability.

Bye for now.

Wednesday, June 27, 2012

Two previous experiments combined.

On April the 6th I posted" My Umbrella entry" and on May 20th I posted "A short experiment" with the idea of using the results at a later date. I liked the colours printed on the reverse of the woodblock and as  I had the Umbrella lino plate handy I printed it out to use up the yellow ink, no wasting here.
The frame is a recycled one of mine so had a new matt board cut this morning.
                                                                      

The mattboard is more of an olive green colour not so brown as it looks here. The centre print is floated and I like the two different textures.


Thursday, June 14, 2012

Woodblock reduction:-post Jill O'Sullivan workshop.

Finally I spent the best part of yesterday cutting away probably over half of the image which I had previously used in the woodblock workshop.
Registration was my biggest concern, as it is with a lot of us I think, and out of the four prints I had run off at home by hand  I have decided there is one reasonable print.

The one "good" one. 


and one of the "others".


Sunday, May 20, 2012

A short experiment.

Today I decided to expand on the last post with a short experiment printing the reverse side of the wethertex woodblock used in the workshop. Not wanting to cut into it yet I inked it with two brayers
and two colours and applying light and heavy layers of ink.
This is the reverse side of the woodblock free of ink.

I like the two colours I mixed and it has possibilities for future use as a background or in collage.


Monday, May 7, 2012

Woodblock Workshop with Jill.

.
A small group of five ladies united for this workshop. Jill travelled from Townsville ,about a four hour drive north of Mackay to conduct the two days .

 We started at ten am both mornings and worked through until 3.30 at least before cleaning up to go home. I went home very happy with my efforts , I had muddled around with woodblocks at home previously but it was great to have a professional "on hand". Everyone had either a drawing prepared or at best an idea to work with. Books on printmaking were readily available to peruse while enjoying a break. Stories about our experiences and information was swapped as we worked alongside each other.

Jill describing many ways on using the Wethertex woodblock. Apparently it is made in Tasmania ,the only place in Australia to manufacture it. It can be used inside or outside the home. One side is smooth and the other was in it's natural state re texture which you can work both sides.I have wondered about a pin press and had researched it in the internet and there it is in the foreground. Very good tool for printing on fine papers and it will give you a bit of a workout too! Getting the pressure right for each type of paper is essential for a good print.
Another new experience was the use of the Dremel, an electric drill and Jill is demonstrating it here. I
found it to be a very concentrated exercise and the use of a mask is advised , you know the usual "drill" for health and safety. Different types of drill bits will produce varying marks/lines and handy to have around especially for large areas.
My drawing on the first block. It was of a local creek I had visited years ago and thought it would give me the chance to develop different marks.

The "nest" for the woodblock to sit in to be printed. The block needs to be supported in this way so that the pin press has an even surface to roll over. The paper of course is laid carefully over the top and a gentle but very firm pressure applied to the pin press, working from all sides and checking as you go. (This is where you get your workout).
Printing with the pin press.
My first pull of the creek and now I can make changes to the plate.
After discussing this print with Jill I cut more out of the creek. I was pleased that I had thought to not cut too much away in the first cutting as this gave me the chance to change the image.The image was growing on me a bit more now as I am not a landscape artists. 
This is the print from the changed block, much nicer!!


I took the block home on Saturday night and changed it yet again by cutting away the small rock in the right hand front corner (of the block) and accidently removed a part of the larger rock too! Oh well , it happens... I do like this and can now handpaint the creek with watercolour in the next edition run. I could make the block as a jigsaw too but I managed to ink the whole block using two rollers.
Sunday 's effort.
Being one who likes still life I had this next image drawn up ready in case I didn't like the creek image, nothing like being prepared.....Ther block is very easy to draw on with pencil and easily erased with an eraser if need be.
Second drawing for Sunday's session. I started cutting a border around it early Sunday morning as had to work out my light next to dark routine.
Partly cut block for Sunday which I finished in the morning.This particulr woodblock has a tendacy to chip so the reverse side wouldn't have that problem as it doesn't have a coating but you would need to work with it's texture.

We all feel in love with this particular colour, apparently the ink is 40 years old and is called champagne ink whic is very silky to use , a bit thicker than what I am used to using so another skill was learnt to be more light handed.I like this block and has future potential too.
Sunday mid-afternoon playtime.I had pine block so played around with that and to use up the excess ink we enjoyed  playing with our blocks on brown paper. This is on white and have definate ideas about this image. In the end my style of cutting was more suited to the pine block  than the wetherboard as I like the clean cuts in produces as with lino.


Friday, April 6, 2012

Umbrella Entry for 2012

This is my third entry for Umbrella Studio in Townsville where each member submits three prints the same size as a compact disc case. One print is enclosed in a case for display, one is for auction to raise money and the other goes to a swap between members. It is always exciting to receive your print and to know who has received yours.

This one is of one of my grandsons visiting the chooks down our back lane which used to be a railway passage into town which has been removed and is now a pathway.
Since I became a Nana it is our habit on babysitting days to go for a walk along this path.
Printed on Fabranio paper from a lino plate with hand painted on the clothes.
                                                                         

Visiting the chooks.

I kept the design simple with just some areas of the wire fence and gate included.

Thursday, February 23, 2012

Swapping Margaret Olley.

As in my previous post I was talking about the group I belong to and the yearly swap we do.

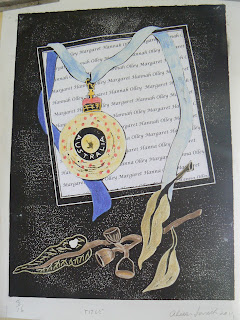
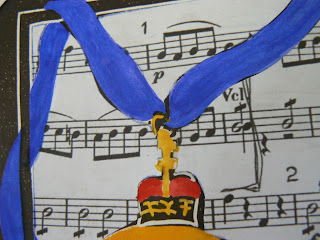
The theme this year was a tribute to Margaret Olley and an obvious choice of subject would be still life.Too easy so I decided to avoid that and approached the trusty computer for more information. I came across the Companion of the Order Medal, there was my subject. So settle back with a cuppa and enjoy your well earned break.....

I put into action the artistic license we all share and chose not to add the Mimosa springs on the ribbon, now there was a challenge which I don't mind from time to time but that was pushing it a bit!!!
One of many drawings.

 A couple of changes have been made, moving on, decisions, decisions.


I think there is something happening with this one even though I like the other one.Maybe I can use it for another project later?


Working on some finer details, do I want the background one colour, the leaves hand coloured or not,
 how much detail should be included?


And this led me to thinking about the border,soooo many ideas to contemplate.

Decision is made and here is the lino plate. Nice and simple in design.


Okay you haven't fallen asleep have you? Maybe you had better get another cuppa. This is a quick  hand pulled print with one idea of where to apply that colour! Don't worry changes are ahead.


And again new ideas forming as I progress. I do like the musical notes , no I don't know the first thing about music , just what I like to listen to. They have a certain quality about them.


See how one thought leads to another. What about calligraphy and use her name so off to practise my calligraphy, which meant I had to consider the size and where will it appear behind the image and how to get it there?

Starting to really develop this piece and can you imagine putting sprigs of flowers on that ribbon?
The size of the prints doesn't change from year to year, one of our conditions . It is the A4  size which means the ribbon isn't especially wide,well not to add sprigs onto....

After having chosen the background under the ribbon and medal it was time to cut away the excess paper.


Nearly finished , just have to cut 15 more prints as it was an edition of 16, the biggest one we have produced for the swap.

Presenting the finished print and I am happy with my choice of not colouring the leaves as it has made a nice contrast to the medal which is the focal point.

As I mentioned in the beginning about still life  I still wanted something to indicate that Margaret was an artist hence the frame and included the gum leaves as the Australian native symbol.